Event Flow in JavaScript
How well do you understand events in JavaScript? Let’s start with a quick test. Guess the output of the following code when we click on the button.
<body>
  <div style="width:100px;height:100px;background:green;">
    <button>I am button</button>
  </div>
  <script>
    function handleClickEvent(event) {
      console.log(`${event.currentTarget.nodeName} ${event.target.tagName}`);
    }
    document.addEventListener('click', handleClickEvent);
    document.getElementsByTagName('div')[0].addEventListener('click', handleClickEvent);
    document.getElementsByTagName('button')[0].addEventListener('click', handleClickEvent);
  </script>
</body>
The console log will be
BUTTON BUTTON
DIV BUTTON
#document BUTTON
If you got this right, great! If not, don’t worry, we’ll break it down.
Event Bubbling and Capturing
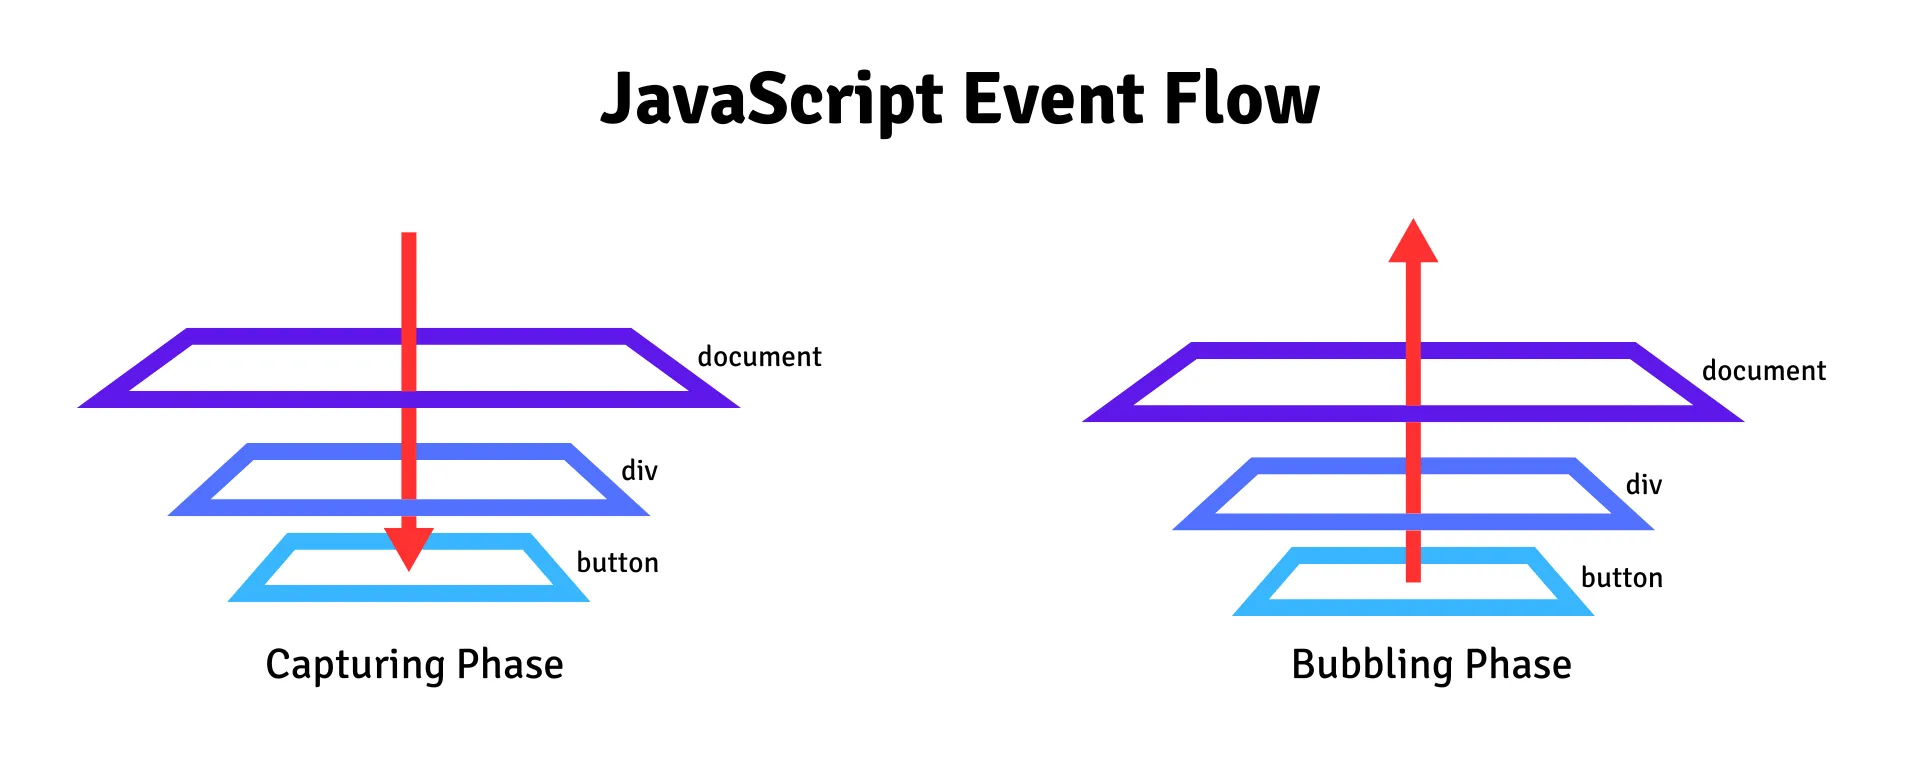
Every event in JavaScript follows two phases:
- Capturing Phase: Event starts from the root (document) and travels down to the target element.
- Bubbling Phase: The event propagates back up from the target to the root.
By default, event listeners listen to the bubbling phase. If you want them to work during the capturing phase, you need to pass { capture: true } when adding an event listener.
Target vs CurrentTarget
Understanding the different between these two is crucial while handling events.
- Target: Has the element which triggers the event.
- CurrentTarget: Has the element on which the event listener is attached to. Below is the code example to understand it little better.
<body>
  <button id="myButton">Click Me</button>
  <script>
    document.addEventListener('click', function(event) {
      console.log(`Target: ${event.target.tagName}`);
      console.log(`CurrentTarget: ${event.currentTarget.nodeName}`);
    });
  </script>
</body>
When we click on the button, the console log will be,
Target: BUTTON
CurrentTarget: #document
Below is the code to understand event bubbling and capturing:
<body>
  <div style="width:100px;height:100px;background:green;">
    <button>I am button</button>
  </div>
  <script>
    const phase = {
      0: 'None',
      1: 'Capturing',
      2: 'Target',
      3: 'Bubbling'
    }
    function handleClickEvent(event) {
      console.log(`${event.currentTarget.nodeName} ${event.target.tagName} ${phase[event.eventPhase]}`);
    }
    document.addEventListener('click', handleClickEvent);
    document.getElementsByTagName('div')[0].addEventListener('click', handleClickEvent);
    document.getElementsByTagName('button')[0].addEventListener('click', handleClickEvent);
    document.addEventListener('click', handleClickEvent, {capture: true});
    document.getElementsByTagName('div')[0].addEventListener('click', handleClickEvent, {capture: true});
    document.getElementsByTagName('button')[0].addEventListener('click', handleClickEvent, {capture: true});
  </script>
</body>
When we click on the button, the console log will be
#document BUTTON Capturing
DIV BUTTON Capturing
BUTTON BUTTON Target
BUTTON BUTTON Target
DIV BUTTON Bubbling
#document BUTTON Bubbling
Preventing Unwanted Bubbling
Sometimes, event bubbling can be problematic. For example, consider a custom dropdown where clicking outside should close it. If you add a click listener to both the dropdown and document, clicking the dropdown itself will also trigger the document event, hiding it immediately.
To prevent this, use event.stopPropagation(), which stops the event from bubbling up.
dropdownElement.addEventListener('click', (event) => {
  event.stopPropagation();
});
Event Delegation
Event bubbling can also be beneficial for performance. Instead of adding event listeners to each row in a large table, attach one listener to the parent element and determine which child was clicked using event.target.
<body>
  <div>
    <button data-number="1">I am button 1</button>
    <button data-number="2">I am button 2</button>
    <button data-number="3">I am button 3</button>
    <button data-number="4">I am button 4</button>
    <button data-number="5">I am button 5</button>
    <button data-number="6">I am button 6</button>
    <button data-number="7">I am button 7</button>
    <button data-number="8">I am button 8</button>
    <button data-number="9">I am button 9</button>
  </div>
  <script>

    function handleClickEventParent(event) {
      if(event.target.tagName === 'BUTTON') {
        console.log(`Button ${event.target.dataset.number} is clicked`);
      }
    }
    document.getElementsByTagName('div')[0].addEventListener('click', handleClickEventParent);
  </script>
<body>
Benefits of event delegation
- Fewer event listeners -> Lower memory usage.
- Easier event management -> No need to loop through all the child element to add / remove event listeners.
Conclusion
Event bubbling and capturing are key concepts that can make a huge difference in how you handle user interactions in your JavaScript applications.
Think of event bubbling like a ripple in the water, when you throw a stone, the waves spread outwards. In similar way, the click event on the child travel up to the root node unless it is stopped. This can be used for delegating events but can cause unintended behavious if not understood properly. By mastering it, you gain more control over application performance and code maintainablity.
